Display and Function Overview
(figure 1)
(figure 2)
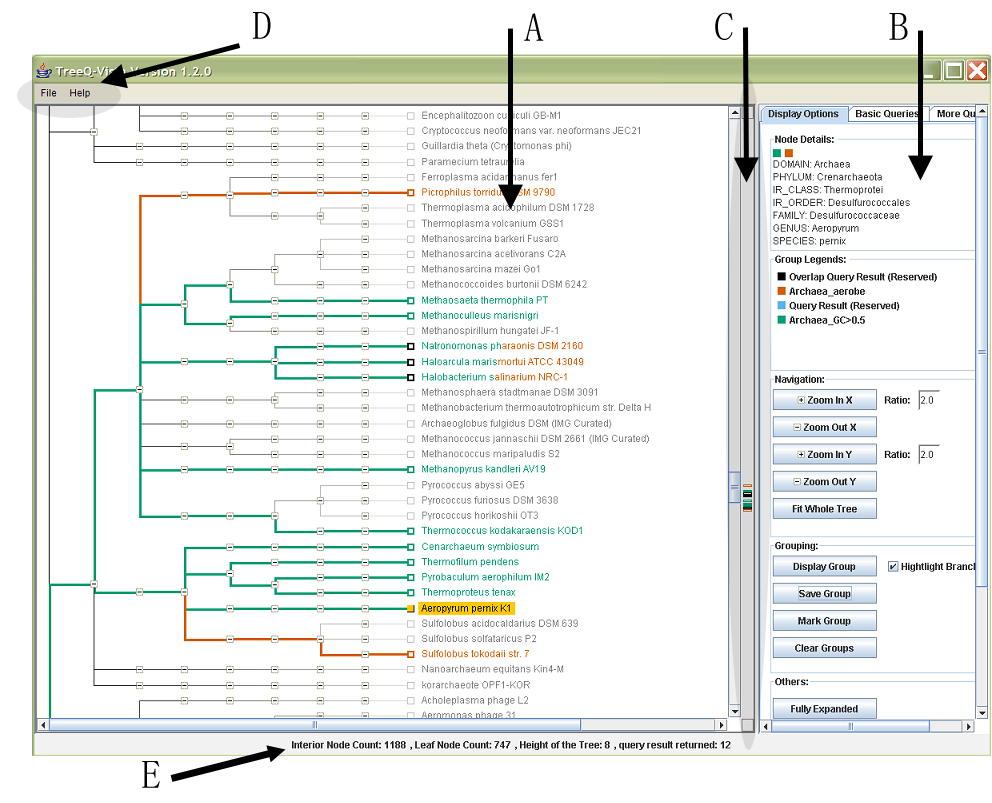
TreeQ-VISTA contains tree viewing panel (A) on the left, tool panels (B) in the tabbed pane on the right, a signal bar (C) located in between the tree viewing panel and tool panels, a menu bar (D) on the top and a brief tree statistics information bar (E) on the bottom. The tabbed tool pane (B) contains three sub panels and they are "Display Options" panel (F), "Basic Queries" panel (G) and "More Queries" panel (H).
Tree Viewing Panel (A)
| Mouse over a node | to highlight the current node in orange and view the details of this node at the Node Details Section of the "Display Option" panel (F). |
| Left click a node | to expand or collapse this node. "+" indicate the node is expandable, "-" indicate the node is collapsible. |
Tool Panels (B)
consists of three sub panels (F, G, H)
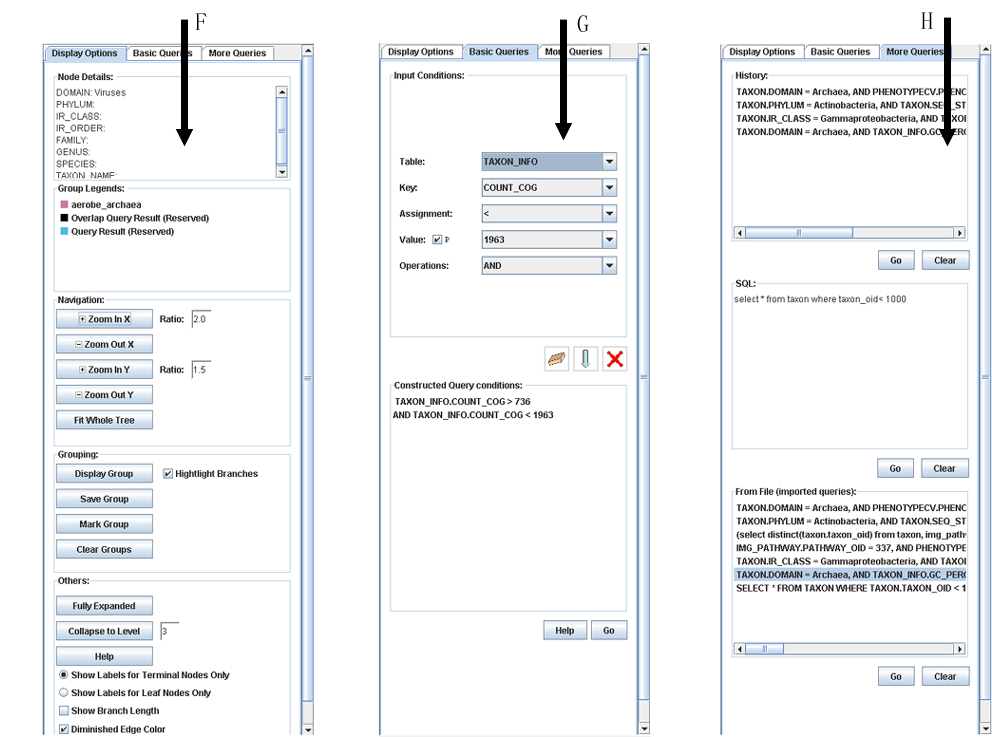
"Display Options" Panel (F)
| Node Details: | Refer to [Tree Viewing Panel->Mouse over a node] |
| Group Legends: | Legends of visible groups are displayed. Sky Blue is the default color for the current query result. Black is the color for overlapping query results. There are nine total colors and seven are non-reserved colors. |
| Mouse Over a Legend: | Mouse over an individual group legend to show the branch color for this color group only. Displaying the branch color helps to find the common ancestor for a group containing a particular property. |
| Zoom In/Out: | Separated in the X and Y direction, zoom in and out are available for viewing flexibility. Enter the ratio to zoom to a desired view resolution. Labels of node names will appear once the resolution is fine enough. |
| Fit Whole Tree: | Fit the whole tree onto the tree view panel. This provides a global view of the tree as well as the biological traits (query results) in relation to the tree. |
| Display Group: | User can choose the group(s) she wishes to display. |
| Highlight Branches: | Highlight branch colors according to the leaf nodes. Multiple color groups can share the same branch or partial branch. A priority color scheme is predefined, so that a particular color always has precedence over another color. Refer to ["Display Option" panel->Mouse over a Legend] for details. |
| Save Group: | Save the current query result (sky blue color group) to a user chosen color group. If the group already existed, the user will be prompted whether she wants to replace it with the current query result. User can not save to the reserved color groups, which are black and sky blue. |
| Mark Group: | Choose a color from the mark group dialog and then single right click on the leaf node(s) in the tree viewing panel. This leaf node will be added to the color group. To remove the leaf node from the group, single right click the leaf node again. |
| Clear Groups: | Clear all the color groups, including the default groups. |
| Fully Expanded: | Expand all the interior nodes in the tree. |
| Collapse to Level: | Specify a level number to collapse the tree to. Level 3 is the default and a level is counted from top down. Root is at level of zero. All children of the collapsed nodes will be collapsed also. |
| Show Labels for Terminal Nodes Only: | Display node names for terminal nodes. |
| Show Labels for Leaf Nodes Only: | Display node names for leaf nodes. |
| Show Branch Length: | Display branch length on each branch of the tree. |
"Basic Queries" Panel (G)
| Table | Properties are stored in a database. After loading the key file, the table and key combo boxes should have been filled automatically. |
| Key: | Key for a property, such as gene_name, phenotype. They are the columns of the tables in a database. |
| Assignment: | Assignment operators are operators for connection key and value for a property, such as <, >, =, like etc. If a partial search is desired, use "like" and put "%" for buffer. ex: like "%aerobe" searches for any string ending with aerobe. |
| Value: | Property is a key and value pair. While for each property there is only one key, there might be many possible values associated with one property. The user can enter the value or use the "populate" button to ask for all possible values. |
| Populate: | The Populate values list is a tool to help in displaying all the possible unique values associated with this key. Usually this process is fast, however, it might take several minutes if the table is large, such as a gene table which might contains several millions of records. |
| Operation: | Operations are logic operations, such as "and", "or", "not", used to connect several conditions in a desired logical way. |
| Add: |
After a condition is constructed by using combo boxes in the "Input Condition" section, add this condition to the "Constructed Query Conditions" section below. |
| Clear: |
Clear all combo boxes in the "Input Conditions" section. If you do not clear the combo boxes and load another .ky file, the previous tables, keys etc. will remain besides the newly loaded information. |
| Remove: |
Select condition(s) from "Constructed Query Conditions" section, press remove button to remove the selected condition(s). |
| Go: | Send the list of conditions to the query engine. |
For example:
COG.COG_ID = COG1035 and TAXON.DOMAIN = "Archaea". There are two conditions in
this query. Key COG_ID is a column in the table COG and key DOMAIN is a column
in the table TAXON. Assignment is "=" for both conditions. Value associated with
key COG.COG_ID is COG1035. Value associated with key TAXON.DOMAIN is "Archaea".
Procedures for constructing a query using basic query tools (no SQL knowledge required):
- Select the value at each combo boxes, if available. For "Value" box, type the value or check the "P" (populate) checkbox to populate a list of all possible values then choose one. The "Populate" operation may take up to several minutes depending on the size of the table in the database. If more than one condition is desired, use the logic operation units such as "and", or "or" to connect conditions.
- Use the "add"
 button
to add this condition to the "Constructed Query Conditions" section below.
button
to add this condition to the "Constructed Query Conditions" section below. - Repeat 1 and 2 to construct queries with more than one condition.
- When finished, click the "Go" button below the "Constructed Query Conditions" section to send the conditions to the query engine.
More Queries" Panel (H)
| "History" section: | Store all the queries the user has entered. Use the "Clear" button below the section to clear all history entries if necessary. To query, select a history entry and use the "Go" button. The history list provides a roll back functionality for a user to repeat the queries they have performed, though for which results might have not been saved. |
| "SQL" section: | Type a SQL statement that you wich to query. Use the "Clear" button to clear this section. Use the "Go" button to send the SQL statement to the query engine. |
| "From File" section: | User can import a pre-constructed query file (.qy) from the menu. Refer to [Import & Export Files-> query file] for file format. Use the "Clear" button to clear this section. Use the "Go" button to send the query to the query engine. |
Signal Bar (C)
Each of the small signals indicates where a trait is displayed. Move the scroll bar next to the signal, the corresponding part of the tree will be displayed for a detailed view in the tree viewing panel.
Menu Bar (D)
File and Help are two menus on the bar. The File menu is mainly responsible for importing and exporting files.
Statistics Bar (E)
The Statistics bar updates the interior, leaf node counts, height of a tree and query result count. After each of the query, query result count is updated until the next query occurs.